Thursday, August 26, 2010

Picture Wall

I.LOVE.PICTURE.WALLS!

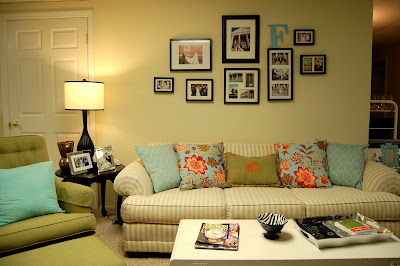
No matter where we moved, I knew that we were going to have a picture wall somewhere! Luckily, our new apartment had the perfect place for one: behind our couch! I can never decide on one picture, so it's only natural that I would want a huge wall of a ton of pictures! I've been collecting inspiration pictures for what seems like forever, here are a few:

My favorite bloggers at Young House Love have this adorable picture wall in their little girl Clara's nursery. LOVE!


After gathering inspiration pictures, I had to decide how I wanted my picture wall to look. Straight, and grid-like, or random and funky? I decided to go the random and funky route because, let's be honest, it was a lot less work! I HATE measuring and using a level to hang pictures, so by doing it this way, I was able to hang it however I pleased! The next decision I had to make was the color and style of the frames. I love the look of using different colors and styles of frames in one picture wall, but I decided to use all black frames to tie in the black dresser that houses our TV (and all of Joe's clothes.) I did change it up a little bit and used some ivory mattes, and some bright white mattes (yeah, yeah, I'm crazy like that!)

I already had a black frame of four Charleston pictures I took on a past trip, so that was my starting off point. Joe and I went to Ikea this past Friday, and I may or may not have laid out an entire grouping of frames on the floor of the picture frame aisle. He was a little embarrassed, but hey, it got the job done! I got 6 black (super cheap) Ribba frames in different sizes, and one other frame that I can't remember the name of. If you have an Ikea near you: run, don't walk and get you some frames (you're going to hear me say this a lot!) When I got home, I ordered the wedding pictures I wanted to put in them on Snapfish, and got to work finalizing my plan!

I was a super dork, and laid all of the frames out on my bed just like I did in the Ikea aisle.


Then I was an even bigger dork, and drew it out on a piece of paper so I would know what I was doing once it came time to hang the frames. It was a HUGE help!


Then TA DA! It was a cinch to hang them! Love, love, love how it turned out! It's exactly what I wanted! Forgot to mention the big blue "F": that was a wooden letter from Hobby Lobby that I spray painted with my favorite blue spray paint. Told you it's my new best friend! I just stuck that sucker up with some velcro strips!


I have some other really great ideas to fill up big empty walls: coming soon! I sure wish I had enough walls to do them all! :)

Wednesday, August 25, 2010

My Best Friend...Spray Paint!

I have always loved spray paint, but it definitely became my new best friend this summer! Since we were decorating on a budget, it was a lot easier to buy something and spray paint it the color we wanted it, rather than buy something full price and brand new. Also, it's a quick and easy way to personalize something and make it all yours!

One of my favorite bloggers from Three Men and a Lady was one of my biggest inspirations! Here are some pictures from a recent post she did about her new guest bathroom. It is full of things that she spray painted; they were once old, and now look brand new!

She spray painted an old, cast iron bird and it is precious! Here is the before:


And here's the after...is this not too cute??


Here is an estate sale mirror she found. I love it in gold and would look so good in a room with an eclectic style, but I absolutely LOVE what she did. I think anything spray painted white turns out perfect!


Here is the after! Don't you just love the white? Love the contrast between the fancy, curvy mirror and the stark white paint!


This is my favorite thing from her new bathroom because I did something similar! You can find these types of frames anywhere! I have found a lot of them at TJ Maxx and Home Goods. Here is her before:


And the after...LOVE it!


I was silly and forgot to take some before shots (just picture them plain and white before), but here are two things I painted with aqua spray paint I bought at Home Depot. For around $6, I totally revamped a picture frame and a cabinet that I already had! Can't get any cheaper than that!

Here is the picture frame. Love it! It adds the little pop of aqua that I wanted in my living room!


This is a cabinet I've had since elementary school. It used to hold all of my Disney princess VHS tapes, my Pogs collection, and old notes from middle school crushes. It was kind of sad to clean it out and paint it, but I love the way it turned out! Since storage in a studio apartment is limited, I decide to bring this cabinet to store my massive collection of jewelry, and also all of my paints and paintbrushes! I spray painted it the same blue as the picture frame, but sanded down all of the edges to give it a weathered look. After that, I still wanted it to be a little more rustic, so I dry brushed on some black craft paint, then wiped it off quickly to give it a little more depth! I also spray painted the old hardware gold, and used a fun glass knob my mom already had! Here it is:


So, the moral of the story is: spray paint can be your new best friend, too! You won't believe the difference it will make! Happy painting!

We're finally in NY!

WOO HOO! We finally made it to New York!

After months and months of planning and packing, and two long days of driving, we made it to White Plains and are finally settled in!

Last week was really hectic: trying to unpack all of the boxes that took over our entire studio, making sure all of our furniture actually fit, and finding a place for everything took a while! Everything is unpacked and put away (for the most part), and it finally feels like home!

I have been collecting furniture and different things for the apartment for the past year or so. I knew that I had to stray away from all of the pink I used in my college apartment, and use a color that was more male friendly! I decided aqua blue would be perfect and wouldn't overpower our tiny little studio apartment. Since it is a studio and is very open, I used the same aqua color throughout the space without overdoing it (in my opinion!)

I also wanted another pop of color in the living area, so I decided to use orange and pear green. I LOVE the way it turned out! We kept the wall colors the way they were when we moved in (beige) and used fun pillows, fabric, and accessories to jazz it up!

Here is what it looked like in when we started, and when it was FULL of crap:


Here are some "After" pictures...or more like "During" since I'm not quite finished!


I have lots of "how to" posts coming soon with detailed pictures!

My sweet friend, Allison, posted about our apartment on her blog, The Owen's Opus. She and her husband live in Colorado, and I miss her terribly. Check her out!