Showing posts with label DIY. Show all posts

Saturday, April 21, 2012

lots of new goodies!

I've had a super successful shopping week! As you know, I have been scouring the internet and stores for the perfect pillows for the couch in our living room...and I finally found what I've been looking for! I ordered the Chiang Mai Mocha pillows from eBay from a seller named cushinumbers {if you are in the market for some Schumacher Chiang Mai pillows...she has a few available in the Alabaster colorway.} The pillow covers came very quickly from England, and are perfect quality! They are absolutely gorgeous! 


These were some examples I posted a while ago when I was searching for new pillows. I really loved the symmetry of the first couch, but also really loved the navy blue pillows with the Chiang Mai fabric on the second couch.{I decided orange pillows would be way too much with the orange curtains} I hit the jackpot this week at a new store called C.Wonder when I found beautiful indigo blue velvet pillow covers for $14.99 each! They were buried in a clearance bin and I wanted to scream with excitement when I found them. I already had the green trellis lumbar pillow in the middle, and it also matches the Chiang Mai pillows perfectly. I LOVE how it all came together!


Did you spot my pretty new floor lamp? I have been on the lookout for an inexpensive gold or bronze pharmacy style floor lamp and I found the perfect one today at Home Goods for $69.99...seriously love that place. 


I did a quick makeover on this little metal and glass side table, since it wasn't in the budget to by a whole new one! I was walking through the tile section at Lowe's today and the pretty white marble ones caught my eye. I knew right away that I needed to get one to cover the ugly glass on that little table. $3...done and done! Super easy and i love the way it looks! I also got the fun owl vase at Bed, Bath, and Beyond today...so in love! {the silver shell is a little memento we bought on our honeymoon in Aruba}


Another fun find from C. Wonder...love the wave print!
 

 {sorry for the dark picture! will take a better one tomorrow}


So excited about all of the changes that I made this week, but I am definitely feeling like the little mouse in If You Give a Mouse a Cookie and am wanting more, more, more! Now that I have pretty pillows, I need a pretty new coffee table and rug to go with it...right?? :)

Monday, September 19, 2011

DIY art!


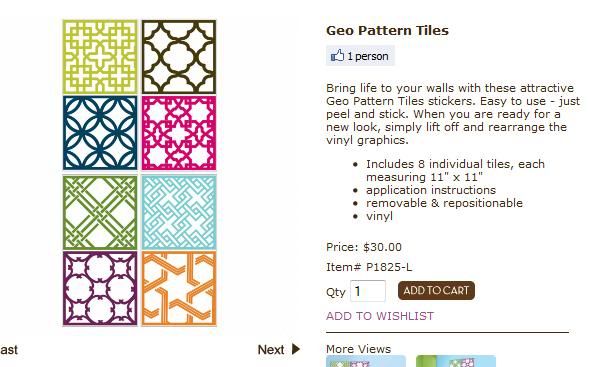
i saw a post on nuestra vida dulce (one of my absolute favorite bloggers ever) about these geometric wall decals, and knew they would be perfect in our new living room. i ordered them that day, and they sat in their packing for months and months until i could figure out what in the world i was going to do with 8 huge stickers. 

via

i thought about buying frames for them, but that turned out to be a little too pricey for this project since i am notorious for changing things up a little too often. coupons in hand, i headed to michael's to find a solution. i ended up with these extremely affordable square 12"x12" canvasas that came two to a pack and thought it would help to make them look more like art and less like cheap stickers. 


they didn't stick very well to the canvas, so i had to use a bit of hot glue...but you would never notice. they make a beautiful, bold statement on the huge wall over the couch, and i am so pleased with how it turned out. 


who knows, i may get tired of them in the next couple of months, but that is the beauty of DIY art for under $50!

the website has tons of different decals to choose from...totally loving this paris map! these would all look great on canvases!

(not a sponsored post, just sharing a fun find!)

Thursday, September 2, 2010

Quick Fix!

My grandparents got new dining room furniture this past year, I was the lucky recipient of their old set! I knew we wouldn't have room for all of it in our studio, so we stuck it in my parents' attic until we move somewhere with a dining room.

Fast forward to the first week of August (a week before the big move;) I had a huge "AHA!" moment after searching high and low for two chairs I could use as extras for our dining table. I already have 4 shabby chic white chairs, but I wanted two totally different chairs to use when we have guests over. I never could find exactly what I was looking for until I was in my parents' attic packing up boxes for the move. I thought, "DUHHH!", why don't I just reupholster two of the beautiful wood dining chairs that my grandparents gave to me??

I've helped my mom reupholster her dining room chairs before, so I knew it would be super easy and a quick fix! I headed out to my favorite fabric store in Greenville in search of the perfect fabric. I knew I wanted something fun in one of my accent colors (aqua, pear green, or orange), and in a fun, graphic pattern to contrast my floral pillows on the couch. After walking round and round the store for way too long, I found the perfect fabric. I bought a yard for $10, and was so excited to get started:


(new fabric on the left, pillow fabric on right)

I absolutely LOVE the polka dots with the floral pattern. I am a huge fan of mixing patterns...some may think that's against the rules, but I say go for it!


(original chair and fabric on the left)

It was super easy to reupholster! I unscrewed the seats from the chair and laid it down on the fabric to see how big of a piece I needed to cut. After cutting the fabric, I used an electric staple gun and stapled the new fabric to the underside of the seat; making sure it was taught all the way around.

They look amazing and are exactly what I wanted! What a cheap, and quick fix!


Here they are in action (not being used since we don't have any friends yet! haha!):


I have seen tons of chairs at thrift store and on Craigslist that are in need of some love! If you are in need of new chairs, think about doing this quick fix!

Thursday, August 26, 2010

Picture Wall

I.LOVE.PICTURE.WALLS!

No matter where we moved, I knew that we were going to have a picture wall somewhere! Luckily, our new apartment had the perfect place for one: behind our couch! I can never decide on one picture, so it's only natural that I would want a huge wall of a ton of pictures! I've been collecting inspiration pictures for what seems like forever, here are a few:

My favorite bloggers at Young House Love have this adorable picture wall in their little girl Clara's nursery. LOVE!


After gathering inspiration pictures, I had to decide how I wanted my picture wall to look. Straight, and grid-like, or random and funky? I decided to go the random and funky route because, let's be honest, it was a lot less work! I HATE measuring and using a level to hang pictures, so by doing it this way, I was able to hang it however I pleased! The next decision I had to make was the color and style of the frames. I love the look of using different colors and styles of frames in one picture wall, but I decided to use all black frames to tie in the black dresser that houses our TV (and all of Joe's clothes.) I did change it up a little bit and used some ivory mattes, and some bright white mattes (yeah, yeah, I'm crazy like that!)

I already had a black frame of four Charleston pictures I took on a past trip, so that was my starting off point. Joe and I went to Ikea this past Friday, and I may or may not have laid out an entire grouping of frames on the floor of the picture frame aisle. He was a little embarrassed, but hey, it got the job done! I got 6 black (super cheap) Ribba frames in different sizes, and one other frame that I can't remember the name of. If you have an Ikea near you: run, don't walk and get you some frames (you're going to hear me say this a lot!) When I got home, I ordered the wedding pictures I wanted to put in them on Snapfish, and got to work finalizing my plan!

I was a super dork, and laid all of the frames out on my bed just like I did in the Ikea aisle.


Then I was an even bigger dork, and drew it out on a piece of paper so I would know what I was doing once it came time to hang the frames. It was a HUGE help!


Then TA DA! It was a cinch to hang them! Love, love, love how it turned out! It's exactly what I wanted! Forgot to mention the big blue "F": that was a wooden letter from Hobby Lobby that I spray painted with my favorite blue spray paint. Told you it's my new best friend! I just stuck that sucker up with some velcro strips!


I have some other really great ideas to fill up big empty walls: coming soon! I sure wish I had enough walls to do them all! :)

Wednesday, August 25, 2010

My Best Friend...Spray Paint!

I have always loved spray paint, but it definitely became my new best friend this summer! Since we were decorating on a budget, it was a lot easier to buy something and spray paint it the color we wanted it, rather than buy something full price and brand new. Also, it's a quick and easy way to personalize something and make it all yours!

One of my favorite bloggers from Three Men and a Lady was one of my biggest inspirations! Here are some pictures from a recent post she did about her new guest bathroom. It is full of things that she spray painted; they were once old, and now look brand new!

She spray painted an old, cast iron bird and it is precious! Here is the before:


And here's the after...is this not too cute??


Here is an estate sale mirror she found. I love it in gold and would look so good in a room with an eclectic style, but I absolutely LOVE what she did. I think anything spray painted white turns out perfect!


Here is the after! Don't you just love the white? Love the contrast between the fancy, curvy mirror and the stark white paint!


This is my favorite thing from her new bathroom because I did something similar! You can find these types of frames anywhere! I have found a lot of them at TJ Maxx and Home Goods. Here is her before:


And the after...LOVE it!


I was silly and forgot to take some before shots (just picture them plain and white before), but here are two things I painted with aqua spray paint I bought at Home Depot. For around $6, I totally revamped a picture frame and a cabinet that I already had! Can't get any cheaper than that!

Here is the picture frame. Love it! It adds the little pop of aqua that I wanted in my living room!


This is a cabinet I've had since elementary school. It used to hold all of my Disney princess VHS tapes, my Pogs collection, and old notes from middle school crushes. It was kind of sad to clean it out and paint it, but I love the way it turned out! Since storage in a studio apartment is limited, I decide to bring this cabinet to store my massive collection of jewelry, and also all of my paints and paintbrushes! I spray painted it the same blue as the picture frame, but sanded down all of the edges to give it a weathered look. After that, I still wanted it to be a little more rustic, so I dry brushed on some black craft paint, then wiped it off quickly to give it a little more depth! I also spray painted the old hardware gold, and used a fun glass knob my mom already had! Here it is:


So, the moral of the story is: spray paint can be your new best friend, too! You won't believe the difference it will make! Happy painting!